Wednesday, September 19, 2012

So This Is September.... And Here's the Quick List of Recent House Projects!

It's been a little while since we've posted a house project update, but so much has been happening!!!  Zach finished out the cedar planter benches and we were able to find some really beautiful ornamental grasses for the boxes (we need to update this photo with one of the planted boxes!!! On the list!).  Of course Sagus and Bailey have taken to grazing them!!!  Training opportunity in-progress.  Zach also used some of our cedar to build a planter in front of the coop similar in style to the benches and that has since been planted with some gorgeous red mums which are thankfully unappetizing!  This past weekend Zach used some of our salvaged brick to build a small patio in front of the coop and it looks amazing and was a great solution to a grass dead-zone that was mucky and muddy at any sign of percipitation.  Oh and we finally finished the new/old door complete with antique mortise lock set!   It looks fantastic and was such an improvement over the old red door.  Next steps!!!  Paint the stairway in a faux linen finish... AND craft a stairway storage system (this one is still in the drawing and erasing stage).  There's also a newel post and banister installation in there somewhere and something about driveway gravel! Oh wait... and a trash/recycling storage shed in the works if we don't run out of cedar from building planters, because you can never have enough planters!!!  Phew... I'm exhausted.

Finished Cedar Benches!!!  Minus awesome ornamental grasses missing ends grazed by fuzzy beasts...
Cute Planter With Starter Mums
The Little Blue House w/ New/Old Door

New/Old Door (still have some repairs to finish out, but almost there!)

Antique Lock Set w/Skeleton Keys (this was a fantastic find at a local salvage place and AFFORDABLE)

Stairway Storage Inspiration (first found at apartmenttherapy.com and also  http://swfl.californiaclosetsblog.com/2011/07/15/add-negative-space-to-your-interior-design-just-breathe)


Friday, July 6, 2012

Cedar Benches!!!!

So here are some sneak peek photos of the new cedar benches.  Zach has been working on these for the last few weekends and they really are starting to take shape!  I was able to find rough cut cedar boards from a mill for about 1/5 of the price of the cedar at our local lumber stores and box stores ... and if you're in Vermont I'll be happy to give you their info.  They were super nice and the price was definitely right.

The three planters for one corner planter bench.

Zach really liked the look of the bark on some of the boards so we decided to keep the rough side out.

Zach, hard-at-work and Sagus, lounging.


Sagus, Dog-In-Charge

Rough Cut Cedar Boards
 
I'm so excited to get these done.  I'm already researching some great mosquito/bug repellant plants that smell GREAT for the planters!  It's a little more modern than we expected, but I've got some great plans to spiff up our old patio furniture to match!  And as a bonus, since our office it just off the porch, the whole room smells like cedar.  Bar-b-que at our house when we're done?!

Works In Progress

So it's been a little while since my last post and I wanted to assure you that so much is still in the works!  We've painted the front porch and stained the front and back decks (a nice dark walnut), laid a brick patio with salvaged historic brick from an old chimney stack in Richmond... AND have started work on some cedar planter benches for the back porch.  I just haven't organized the pictures!  Which is pretty lazy on my part, but... we've also been traveling and celebrating weddings and going on canoeing adventures... and well... completely failing at gardening (although the planted beds in the front and side of the house are doing very well... in spite of me).  Zach wanted me to make sure you knew he was making progress on the lawn... which has seen at least two! sod replacements... :(  So some success is better than none, right?

This is sorta the idea, but ours is made from cedar and much more streamlined than this version from projectplans.net 
We're also planning some changes inside the house, which I'm thrilled about.  We're finally putting in the all important fan in the little bathroom (condensation has been completely ruining our paint job) and we're designing the finishing touches to our stairway, including a faux linen wallpaper paint finish, some salvaged newel posts, and gorgeous brushed nickel brackets that I found at a restoration store.  We're thinking a walnut stained handrail to keep with the pine/walnut contrast.

Essentially this is the faux finish we're shooting for, but in shades of gray and blue. (This image taken from http://theexprocrastinator.blogspot.com).
So all that said, pictures to come!  Happy Summer!!!

Monday, June 4, 2012

Bathroom Renovation - We Survived


I've been putting off this post for as long as I could.  Our bathroom renovation was complicated.  Unexpected issues cropped up constantly and even though the bathroom space is small, the small size was the cause of a lot of design headaches.

When we toured the house the bathroom was in good shape.  It had a reasonably new tub, clean fixtures, and the layout was definitely workable.  Initially we had thought we'd keep the bathroom as it was, but as we got further into our renovation work we kept hearing the old mantra about the bathroom and kitchen being the most important aspects of a house renovation and begrudgingly began reworking the budget to include it.

The bathroom had a few problems.  The most pressing was the small window over the tub.  It provided the only natural light in the room and was the only way to vent the space, but was exposed to the shower head and wasn't protected from water damage.  Zach and I decided that since it was unreasonable to remove it we'd try to find a way to protect the sill.  However we couldn't really move the tub without expanding the bathroom into the front bedroom, which was already suffering from space limitations.  Our solution? a claw foot tub with shower fixture and curtain surround.  I scoured ebay, the classifieds, and craigslist for a claw foot tub small enough to fit in the space and finally found one that had been removed from an apartment just down the street!  We also found a great local tub refinisher and was able to restore the tub to its previous glory, all for less than the price of reproduction tubs (around half the price) that were the same size and style.  We were also able to find reproduction fixtures for a great price online.

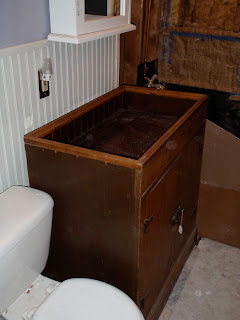
Next we needed to figure out how to increase the storage in the bathroom.  When we bought the house there was only a small medicine cabinet in the space and the family had relied extensively on the linen closet in the hallway for storage, but we wanted to be able to store away all our bathroom products without having to jump across the hallway to get toothbrushes or shampoo.  At first I had experimented with designing a sink cabinet from an old antique furniture piece.  But nothing was small enough to accommodate the new tub (and associated spacing) and the toilet, even after we had enclosed the chimney and gained some floor space by removing the strange half "box" around the stack.  I eventually settled on a sink cabinet that had two drawers and an open space underneath to help make the bathroom feel larger.  It really helped.  We also replaced the medicine cabinet with a "picture frame" style that hid all the hinges AND replaced all the light fixtures with 1920's style ones from a restoration company (used and a steal).  How'd we do?

Experiment in Bathroom Design - My Sketch of a Converted Antique  Furniture Piece
Old Antique Wash Stand - Way Too Big
Zach - Squished
Still Too Big
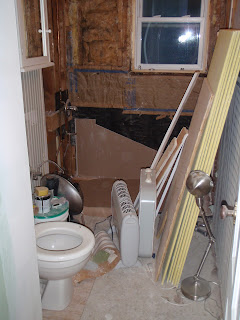
Bathroom Mostly Gutted
Tile
A Modern Cabinet - Still Too Big (notice the tub paper cutout in the background for size)
Fantastic Reproduction Tub Fixture (awesome)

We got this faucet for a steal!

And it FITS! (The tub actually was originally two-toned)
   
Still Fits! 
The New Toilet (funny that you can get excited about a new toilet... but I love it!)

A close-up of our new light fixture and an etsy towel rack made from salvaged tin ceiling.  

TV trays don't work for everyone


Our tiny blue house has a tiny kitchen and no space for eating and while we're pretty much coffee table diners we thought it might be important to have space for guests.  TV trays are not as classy in reality as we had hoped (although very effective!).

The dining room had two built-ins, a corner cabinet with glass doors that was installed in the 1950's (signed and dated "What a long job") and another built-in cabinet that was built into the space around the chimney.  We removed both, pulled down the drop ceilings, fixed the 1950's drywall, and painted... a lot.  We also tightened the space around the chimney, reinstalling piping agains the old chimney stack, and rebuilt the space around, making it significantly smaller as a means of expanding the floor space as much as possible.


Back of Corner Cabinet "What a long job"
Corner Cabinet and Repaired Ceiling
Chimney Cabinet Removed
Photo of Inside of Cabinet "Box"
After - Chimney Cabinet Removed and "Box" Resized
In keeping with the period of the house we wanted the space to feel bright and formal and so we set to work installing a chair rail (at a more appropriate height - the old one was nearly three inches higher than most chair backs) and began searching for the perfect light fixture, classic and elegant but not too chunky (we were dealing with one of the smallest dining spaces EVER).  I had my heart set on the dripping crystal chandeliers of the early 20th century, the ones with intricate brass moldings (not the glass body types that became popular mid century).  I had looked at some beautiful recreations, all beyond our budget.  After three months of searching we finally found it.  A 1902 brass and crystal chandelier from Spain... and it was perfect.  AND I'm taking it with me when we move!  Wouldn't you?


Tuesday, May 29, 2012

Bedroom Beautification

As I explained in an earlier post, we were really trying to get as far away from the bland white walls of our apartment days as possible.  Some may think we went a tad too far with the boldness of our color pallette, but we really wanted to go bold or go home.  While the bedrooms themselves didn't have very many renovation needs, mainly the removal of drop ceilings, the removal of plywood closet doors (the makeshift ones in the front bedroom), the installation of crown molding, plaster wall repair, etc., we still ran into some renovation glitches.

The bedrooms had many many layers of paint and wallpaper.  The house (which is nearly 120 years old) had plaster walls and our painter didn't feel comfortable trying to remove the wallpaper for fear it would completely destroy the crumbling historic plaster underneath.  As a safer alternative we decided to add yet another layer of paint (a choice that made me cringe until I saw the finished product).  To create the illusion that the paint was applied directly over plaster, our painter smoothed the walls with a thin layer of mud and then lightly sanded before painting.  It actually worked!  And looks perfect!  No muddy, oily, wallpaper walls.  Thank goodness.


Front Bedroom
Front Bedroom
Antique Walnut Chifferrobe Detail
Closet Doors Removed (we now have a linen-like curtain cover for both doors)
Hallway Molding Detail
View From Hallway into Front Bedroom
We also added crown molding, which presented another finishing problem for the eaves (our house is technically only 1.5 stories).  The crown molding, set against the ceiling, had to be built out to be sure to adjoin the eaves and the painter had to do some painting magic to make the seams and built out segments seamless.  I've never seen such straight paint lines in my life.  And if you are in the northern Vermont area and need an interior painter I'll be glad to give you his contact information.  He's a genius.

Back Bedroom, Refinished Floor and Blue Paint (can you tell we love blue?)
Back Bedroom, Built-Ins Repainted
Back Bedroom, Antique Dresser
Back Bedroom, Painter Magic - Molding


Is it really a Vermont house if it doesn't have a wood stove?

Wood stoves are quintessential Vermont.  Mainly because it's absolutely frigid here, but judgement aside, there's nothing like a warm fireside and hot chocolate to take away the chills of a Vermont winter's day.  (Ok now I just sound silly).  We were pretty disappointed to find there wasn't a working fireplace or even a pellet stove when we toured the house.  In fact, it may have been the only house we toured that didn't have some type of cozy fireside accommodation and as soon as we started the renovation we began to search for some solution.

In the beginning we had considered installing a wood stove, but the installation of a wood burning stove was too expensive.  We also considered a pellet stove, but I couldn't bring myself to give up the gentle flicker of a more natural looking fireside.  Finally we settled on a gas wood stove and found an absolutely beautiful one, open on three sides with an elaborate tree motif.  It was called the "tree of life" and is available from Avalon.  I highly suggest seeing one in person if you're considering a gas stove.  The logs were the most realistic we could find and the sculptural quality of the stove itself was worth the headache to find a perfect fit for our little house.  While I miss the crackle of a real wood stove, it's nice not to have to clean out ash or make any more of an effort to build a fire than to turn on a light.

Wood Stove (Corner Placement in Living Room)

Tree of Life Detail

Tree of Life Wood Stove

Cozy