Tuesday, May 29, 2012

Bedroom Beautification

As I explained in an earlier post, we were really trying to get as far away from the bland white walls of our apartment days as possible.  Some may think we went a tad too far with the boldness of our color pallette, but we really wanted to go bold or go home.  While the bedrooms themselves didn't have very many renovation needs, mainly the removal of drop ceilings, the removal of plywood closet doors (the makeshift ones in the front bedroom), the installation of crown molding, plaster wall repair, etc., we still ran into some renovation glitches.

The bedrooms had many many layers of paint and wallpaper.  The house (which is nearly 120 years old) had plaster walls and our painter didn't feel comfortable trying to remove the wallpaper for fear it would completely destroy the crumbling historic plaster underneath.  As a safer alternative we decided to add yet another layer of paint (a choice that made me cringe until I saw the finished product).  To create the illusion that the paint was applied directly over plaster, our painter smoothed the walls with a thin layer of mud and then lightly sanded before painting.  It actually worked!  And looks perfect!  No muddy, oily, wallpaper walls.  Thank goodness.


Front Bedroom
Front Bedroom
Antique Walnut Chifferrobe Detail
Closet Doors Removed (we now have a linen-like curtain cover for both doors)
Hallway Molding Detail
View From Hallway into Front Bedroom
We also added crown molding, which presented another finishing problem for the eaves (our house is technically only 1.5 stories).  The crown molding, set against the ceiling, had to be built out to be sure to adjoin the eaves and the painter had to do some painting magic to make the seams and built out segments seamless.  I've never seen such straight paint lines in my life.  And if you are in the northern Vermont area and need an interior painter I'll be glad to give you his contact information.  He's a genius.

Back Bedroom, Refinished Floor and Blue Paint (can you tell we love blue?)
Back Bedroom, Built-Ins Repainted
Back Bedroom, Antique Dresser
Back Bedroom, Painter Magic - Molding


Is it really a Vermont house if it doesn't have a wood stove?

Wood stoves are quintessential Vermont.  Mainly because it's absolutely frigid here, but judgement aside, there's nothing like a warm fireside and hot chocolate to take away the chills of a Vermont winter's day.  (Ok now I just sound silly).  We were pretty disappointed to find there wasn't a working fireplace or even a pellet stove when we toured the house.  In fact, it may have been the only house we toured that didn't have some type of cozy fireside accommodation and as soon as we started the renovation we began to search for some solution.

In the beginning we had considered installing a wood stove, but the installation of a wood burning stove was too expensive.  We also considered a pellet stove, but I couldn't bring myself to give up the gentle flicker of a more natural looking fireside.  Finally we settled on a gas wood stove and found an absolutely beautiful one, open on three sides with an elaborate tree motif.  It was called the "tree of life" and is available from Avalon.  I highly suggest seeing one in person if you're considering a gas stove.  The logs were the most realistic we could find and the sculptural quality of the stove itself was worth the headache to find a perfect fit for our little house.  While I miss the crackle of a real wood stove, it's nice not to have to clean out ash or make any more of an effort to build a fire than to turn on a light.

Wood Stove (Corner Placement in Living Room)

Tree of Life Detail

Tree of Life Wood Stove

Cozy


Odds and Ends

I suppose the most challenging aspects of interior design are the details and I didn't realize there were so many until we took on this renovation project.  Honestly, before now I'm not sure I ever really noticed the size and shape of trim pieces, the metal tone of light fixture finishes, or the detail of floor vents.  In fact I'm sure I didn't notice any of it, but now I can't seem to ignore all these little details (at least in my own home).  

When we purchased the house there were a few little things that were off.  The most noticeable was the slate tile in the front foyer, which over the course of many Vermont winters and as the result of being incorrectly installed, was coming loose.  We're pro-salvage (and deal finders) so we wanted to keep as much of the original tile as we could.  Luckily we found an entire box of slate hidden away in a corner of the basement, but not enough to retile the entire foyer.  We decided to get a little creative with the tile design so that our consequent mismatched slate tile looked intentional.  How do you think we did?

Slate Foyer Before 

Slate Foyer After

Slate Foyer After

The Fence (midway video walk through)

We have two dogs, a cat, and three chickens (although the chickens are somewhat new) and the three quarter fence that came with the house wasn't really going to work for our furry family.  Here's a video in the middle of the renovation that shows our new fence and some of our projects at mid-point.


Three-Season Bonus Room to an Office Oasis (ok maybe not, but still better)

So last time we were in the "bonus" room we had pulled up the carpet and drywalled the panelling.  The "bonus" room, which would become our office, was actually a really tough renovation only because it was such an impermanent space.  It was a converted back porch and the idea of spending a lot of our budget on refinishing floors or putting in finished hardwoods was really hard to justify.  We needed to come up with a plan that made use of the materials in place and basically shined things up - presentable but not necessarily renovated in the strictest sense of the word.  Because it was such an impermanent space and had seen its fair share of changes, we felt a certain kind of freedom in sprucing it up.  Not really required to hold so firmly to preservation philosophies, we became more open to experimental finishes.

In imagining the paint finishes for the house we decided to stay far far away from white walls (minus the breadboard in the bathroom, the trim throughout the house, and the white cabinets in the kitchen).  Finally having the opportunity to personalize our space, a luxury we never really had as renters, we really wanted to stay away from the sterilized (or not so much) white of our apartment days.  So nothing in the house is really white, but in imagining the office I was inspired by the all white rooms I had seen in design magazines, especially those rooms with rough or unfinished walls and trim (barn renovations etc.).

To achieve this the floors were painted gray and then a thin layer of white paint was applied overtop.  To get a funky finish that also hid the imperfections of the porch boards, we then sanded the floors to scuff them which revealed the grays of the paint layer below.  Awesome.  And as a bonus it hides dirt fantastically! (quite a feat for an essentially white floor).

Funky Scuffed Floor Treatment
The walls were then painted a very pale blue to create some visual depth.  And as the room was mostly white, we decided to create visual interest by painting and then scuffing the exterior wall of the house (whose clapboards had been replaced with a type of breadboard at some point in its history).  It was painted a light blue (we're told kind of beachy).  We eventually put ceiling lights that highlighted the wall - our future "art wall" once we get around to it!  In the meantime the texture seems to stand on its own.


Funky Scuffed Floor and "Art Wall"
A large bookcase was built into the wall leading into the basement. It was a heavy, chunky pine piece left over from the 1980's renovations.  After some time spent in the office we realized that it really wasn't large enough to accommodate our collection of books and decided to build our own, an entire wall of bookshelves made from salvaged barn board grayed in the sun.  We also utilized stainless steel streamlined brackets which were heavy-duty enough to manage the weight.  So far so good.

Massive Barn Board Shelving Wall
Craigslist Leather Reading Chair
The desk and storage space was more complicated to design.  Our initial desk was L-shaped, but took up too much of the office's limited floor space.  We recently replaced it with a rectangular built-in with a gray wood stained top and white drawers.  Zach is an amazingly crafty (and patient) guy.

Original L-Shaped Desk
New Space Savvy Desk


Floors Are Important

In writing this I realize I should have dug up the name of the fantastic floor finishing company we discovered to help us with our renovation project.  They were the only company that didn't insist that we replace our kitchen floor and for that I will always be grateful.  The house had gone through a few stages of renovation, a pretty extensive one in the 1980's as well as a pretty comprehensive one sometime in the 1950's (I know this because some of the built-ins were signed and dated!).  As such the house has two main types of wood flooring, something commonly called pumpkin pine and a maple.  The entire upstairs was redone in maple sometime in the 1950's and so was the dining room.  The dining room was especially interesting because it was finished using salvaged boards, each diverging in width and length as you moved across the floor.

When we decided to refinish the floors we had to make a difficult choice, pull up the pine in the dining room and hope for the best or refinish it as it was.  We took the plunge and decided to pull it up.  The uneven finish from the salvaged wood was difficult to clean and we hoped that a more uniform first floor, all pine, would look better overall.  However we risked finding only subfloor and then being forced to find salvaged pine elsewhere or worse trying to use new flooring which we knew would never really match.

Luckily the pine was still intact under the maple and in really good shape.  We also found that the 1950's renovation had altered the house's original floor plan.  A cut out from a previous wall that divided the dining room lengthwise was uncovered.  The doorway from the kitchen had also been moved slightly to the south.  We guessed that this may have been an original butler's pantry that opened directly from the kitchen.  The wall was likely removed in the 1950's and the doorway relocated to create a larger dining area.  We had to salvage pine from underneath our new cabinetry to fill in this gap and while it isn't perfect, it definitely adds character to the home (or at least adds to the character it already has!).


Floor Refinishing, Living Room
Floor Refinishing, Kitchen
Floor Refinishing, Stairway
Floor Refinishing, Stairway 
Floor Detail - Kitchen
Floor Refinishing, Dining Room
Floor Detail - Stairway
Floor Detail and Kitchen Cabinet Molding (and an authentic dog fuzzy)

Kitchen Renovations Aren't for the Weak of Heart

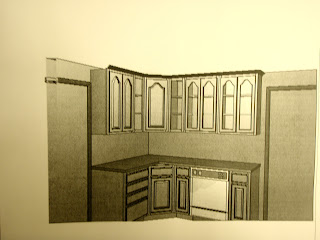
As you probably have heard in most real estate blogs and renovation magazines, the most important rooms in your house are typically the kitchen and the bathroom.  And in the case of our little blue house, both were in dire need of updating.  The kitchen was particularly challenging because of its layout, with two windows and four doorways, our options were pretty limited.  Removing or shortening the windows was completely out of the question (our budget was pretty tight and I was trying to stretch it as much as possible) and the doorways were, well, doorways.   That said we decided to take advantage of some fantastic sales at one of the huge home improvement stores in our area and with the help of one of their dedicated kitchen designing staff, got around all of our obstacles.  It took two full weeks of designing and scrapping a pile of ideas.  And the poor salesman pretty much knew everything about us and our house by the end.  If the rest of the house was finished I'm pretty sure we would have had him over for dinner! But, as it was, we didn't really have a dining room, or furniture, or a fridge.  Next time pizza on the front porch!

The All-Important Corner Sink Kitchen Design

Kitchen Design, Corner Sink

Kitchen Design, Looking into Dining Room

Kitchen Design, Fridge Cabinet
We essentially gutted the kitchen, pulling down the drop ceiling and dry-walling almost everything.  All of the old cabinets were removed and donated and, as I said, we took weeks trying to figure out how to fit everything into such a small and limited space.  Our final solution (and important option if you find yourself in a similar circumstance) a corner sink.  Thank the renovation gods for corner sinks!  Otherwise it was a sink or fridge, but not both!

Kitchen, Drop Ceiling Removal

Kitchen, Drop Ceiling Removal

Kitchen, Experiments in Drywall Salvage (we ended up replacing all of it)

Kitchen, Drop Ceiling Removed and Very Damaged Pine Floor Exposed

We also removed all of the old laminate flooring.  There were six or so layers of various flooring, including one asbestos tile layer (which was removed by some very fantastic experts).  All in all it was nearly three inches of flooring.  And as luck would have it, the original pine floors were still under everything and in-tact.  We had to enlist refinishing gurus with a conservation leaning to save the floor, but it was well worth it.

I suppose it's also important to mention the extreme slope of the floor.  Enough to send the fridge across the room to meet up with the stove.  When we purchased the house the previous owners had actually nailed a board to the floor to act as a barrier to prevent the fridge from sliding across the kitchen.  So in the first weeks of renovation we actually had specialists level the floor as much as possible and sure up some of our supporting beams to prevent settling in the future (or as much of it).  In the end, the room still has a slight slant, but not enough to move appliances, and not enough to be noticeable (ie. you don't wonder if you've become spontaneously drunk every time you enter the kitchen).  However, it presented some interesting challenges to fitting cabinets in the space as not a single corner was 90 degrees and the room lost about three inches of height across the ceiling.  Luckily we had a fantastic carpenter who also managed to help install our granite countertops on level cabinet bases and artfully hid all of his carpentry magic.

In choosing kitchen finishes we decided to utilize as much white as possible.  This was our way of brightening an otherwise small space and creating the illusion of a much larger kitchen area.  And in keeping with the historic nature of the house, we chose classic details such as white subway tile and glass knobs (not wholly accurate, but generally keeping with the overall feeling of the house).  We also were able to find a few lightly used or new appliances on craigslist.  The stove was only about a year old and the fridge was brand new, not quite a perfect fit for someone else's renovation project.  Both were great finds and I strongly suggest you at least attempt the classified's option before resorting to shiny new.  Our dishwasher and microwave were discount online specials and also incredibly affordable for stainless steel.

The Corner Sink Realized :)
Used Stove and Discount Microwave
Subway Tile Detail (notice our gorgeous granite counter tops - I love VT)
New Cabinets
Glass Cabinets and New Lights
New/Used Fridge and Cabinet (PS. How fantastic are these floors?!)

Adventures in Home Improvement


When we first acquired the house we set to making some improvements ourselves, sweat equity being more affordable for the projects we thought were "doable" on our own.  Our first project was the back "bonus" room, covered in thick pine panelling from a renovation that we guessed dated to the 1980's.  In fact, there were several renovation projects that seem to have the same signature... overbuilding.  Well done work, including the built-ins in the back bedroom, but over engineered, like the shelving in the master bedroom which was strong enough to manage several 45 lb. weight plates, if not a really big shoe collection.  While we appreciated the labor and quality craftsmanship of the 1980's renovation, we really wanted to update the "bonus" room into something more than a three-season porch and set to work covering the pine panelling with drywall and pulling up the carpeting.  It was a project.  The sub flooring was covered in thin sheets of plywood and like everything else from this period of renovation, overdone with TONS of nails (someone really enjoyed the nail gun) which made removal slow going. After a few long nights we were able to remove everything, exposing the original back porch floor underneath and revealing a few porch additions - noticeable due to the differing board widths and direction changes.  It was a fun find and we decided to try to finish the floor to retain its quirky layered (ha!) history.  The video above chronicles our progress and also shows the sticky glue-ish substance we uncovered when we removed the carpet scraps from the stairwell and hallway.  Good news... the hardwoods were still in-tact! (maple and white pine).    

The Little Blue House, Before Renovation Video


When we were searching for our future renovation project (yup, we willingly stepped into that one!) we videotaped our initial walk throughs.  This is our little blue house before our renovation.  We think... still pretty cute.  And yes the house next door still has polka dots... it's been a great landmark for visiting relatives and friends (silver lining, right?).

House Renovation Extravaganza... ie. It really really never ends.


We've been slowly renovating a tiny blue victorian folk house since 2009 and it has been a mostly hysterical adventure or misadventure in stewardship.  The two bedroom, one bath house has been a challenge, even considering its tiny size, but has taught us a lot about interior design, maintenance, and what matters (the huge hole in the dining room ceiling) and what doesn't (imperfect paint lines, angled walls, creaking everything!).  And in the end, even with the plumbing explosions, gardening fiascos, and frustrating kitchen design, we love it.  It comes from a long lineage of stewardship, the remnants of care and quirky visions still uncovered in every weekend project and we're proud to be a part of that history.